
My previous tutorial explains how to download a file by showing a progress bar. In this article I am going to explain how to upload a file to server by showing the progress bar. Using this tutorial you can build an app like Instagram where you can capture image or record a video using camera and then upload to a server. On the server side, I used PHP language to read the file and moved it to a particular location.
The best thing about this article is, it works well with larger file uploads too without any out of memory errors. I have tested the app by uploading 50MB file flawlessly.
Contents
Prerequisite
As this article uploads the image/video taken from camera, you need to have knowledge over android camera module. So I recommend you go through my previous tutorial Android Working with Camera which gives you an overview of integrating camera in your android apps.
1. Creating Android Project
1. In Eclipse create a new android project by navigating to File ⇒ New ⇒ Android Application Project and fill out all the required details.
2. Open strings.xml located under res ⇒ values and add below string values.
string.xml
<?xml version="1.0" encoding="utf-8"?>
<resources>
    <string name="app_name">Camera File Upload</string>
    <string name="btnTakePicture">Capture Image</string>
    <string name="btnRecordVideo">Record Video</string>
    <string name="or">(or)</string>
    <string name="btnUploadToServer">Upload to Server</string>
</resources>
3. Add below color values in colors.xml located under res ⇒ values folder.
colors.xml
<?xml version="1.0" encoding="utf-8"?>
<resources>

    <color name="view_background">#e8ecfa</color>
    <color name="btn_bg">#277bec</color>
    <color name="white">#ffffff</color>
    <color name="txt_font">#4e5572</color>
    <color name="action_bar">#1f2649</color>

</resources>
4. Now under src folder create a new class named Config.java. This class file contains file upload URL and image directory name to save the image/video on mobile memory. You will have to replace the file upload url with yours while testing.
Config.java
package net.infotheme.camerafileupload;

public class Config {
    // File upload url (replace the ip with your server address)
    public static final String FILE_UPLOAD_URL = "http://192.168.0.104/AndroidFileUpload/fileUpload.php";

    // Directory name to store captured images and videos
    public static final String IMAGE_DIRECTORY_NAME = "Android File Upload";
}
5. Create a class named AndroidMultiPartEntity.java and paste below code. This class is a custom MultipartEntity class which provides very important functionality required for this project such as progress bar incrementation.
AndroidMultiPartEntity.java
package net.infotheme.camerafileupload;

import java.io.FilterOutputStream;
import java.io.IOException;
import java.io.OutputStream;
import java.nio.charset.Charset;

import org.apache.http.entity.mime.HttpMultipartMode;
import org.apache.http.entity.mime.MultipartEntity;

@SuppressWarnings("deprecation")
public class AndroidMultiPartEntity extends MultipartEntity

{

    private final ProgressListener listener;

    public AndroidMultiPartEntity(final ProgressListener listener) {
        super();
        this.listener = listener;
    }

    public AndroidMultiPartEntity(final HttpMultipartMode mode,
            final ProgressListener listener) {
        super(mode);
        this.listener = listener;
    }

    public AndroidMultiPartEntity(HttpMultipartMode mode, final String boundary,
            final Charset charset, final ProgressListener listener) {
        super(mode, boundary, charset);
        this.listener = listener;
    }

    @Override
    public void writeTo(final OutputStream outstream) throws IOException {
        super.writeTo(new CountingOutputStream(outstream, this.listener));
    }

    public static interface ProgressListener {
        void transferred(long num);
    }

    public static class CountingOutputStream extends FilterOutputStream {

        private final ProgressListener listener;
        private long transferred;

        public CountingOutputStream(final OutputStream out,
                final ProgressListener listener) {
            super(out);
            this.listener = listener;
            this.transferred = 0;
        }

        public void write(byte[] b, int off, int len) throws IOException {
            out.write(b, off, len);
            this.transferred += len;
            this.listener.transferred(this.transferred);
        }

        public void write(int b) throws IOException {
            out.write(b);
            this.transferred++;
            this.listener.transferred(this.transferred);
        }
    }
}
Now we’ll add camera support in our app by creating a simple screen with two buttons to invoke camera app to capture image or record video.
6. Open your AndroidManifest.xml file and add required permissions. You can notice that UploadActivity also added in below manifest file. We’ll create it in few minutes.
INTERNET – Required to make network calls
WRITE_EXTERNAL_STORAGE – Required to store image/video on to storage
RECORD_AUDIO – Required to record audio along with video
AndroidManifest.xml
<?xml version="1.0" encoding="utf-8"?>
<manifest xmlns:android="http://schemas.android.com/apk/res/android"
    package="net.infotheme.camerafileupload"
    android:versionCode="1"
    android:versionName="1.0" >

    <uses-sdk
        android:minSdkVersion="11"
        android:targetSdkVersion="21" />

    <uses-permission android:name="android.permission.INTERNET" />
    <uses-permission android:name="android.permission.WRITE_EXTERNAL_STORAGE" />
    <uses-permission android:name="android.permission.RECORD_AUDIO" />

    <application
        android:allowBackup="true"
        android:icon="@drawable/ic_launcher"
        android:label="@string/app_name"
        android:theme="@style/AppTheme" >
        <activity
            android:name="net.infotheme.camerafileupload.MainActivity"
            android:label="@string/app_name"
            android:screenOrientation="portrait" >
            <intent-filter>
                <action android:name="android.intent.action.MAIN" />

                <category android:name="android.intent.category.LAUNCHER" />
            </intent-filter>
        </activity>
        <activity
            android:name="net.infotheme.camerafileupload.UploadActivity"
            android:screenOrientation="portrait" >
        </activity>
    </application>

</manifest>
7. Open the layout file of your main activity (activity_main.xml) and add below code. This creates a layout with two buttons.
activity_main.xml
<?xml version="1.0" encoding="utf-8"?>
<RelativeLayout xmlns:android="http://schemas.android.com/apk/res/android"
    xmlns:tools="http://schemas.android.com/tools"
    android:layout_width="fill_parent"
    android:layout_height="fill_parent"
    android:background="@color/view_background"
    android:baselineAligned="false"
    android:orientation="vertical" >

    <LinearLayout
        android:layout_width="fill_parent"
        android:layout_height="wrap_content"
        android:layout_centerInParent="true"
        android:gravity="center"
        android:orientation="vertical" >

        <!-- Capture picture button -->

        <Button
            android:id="@+id/btnCapturePicture"
            android:layout_width="wrap_content"
            android:layout_height="wrap_content"
            android:layout_marginBottom="20dp"
            android:background="@color/btn_bg"
            android:paddingLeft="20dp"
            android:paddingRight="20dp"
            android:text="@string/btnTakePicture"
            android:textColor="@color/white" />

        <TextView
            android:layout_width="wrap_content"
            android:layout_height="wrap_content"
            android:layout_marginBottom="20dp"
            android:gravity="center_horizontal"
            android:text="@string/or"
            android:textColor="@color/txt_font" />

        <!-- Record video button -->

        <Button
            android:id="@+id/btnRecordVideo"
            android:layout_width="wrap_content"
            android:layout_height="wrap_content"
            android:background="@color/btn_bg"
            android:paddingLeft="20dp"
            android:paddingRight="20dp"
            android:text="@string/btnRecordVideo"
            android:textColor="@color/white" />
    </LinearLayout>

</RelativeLayout>
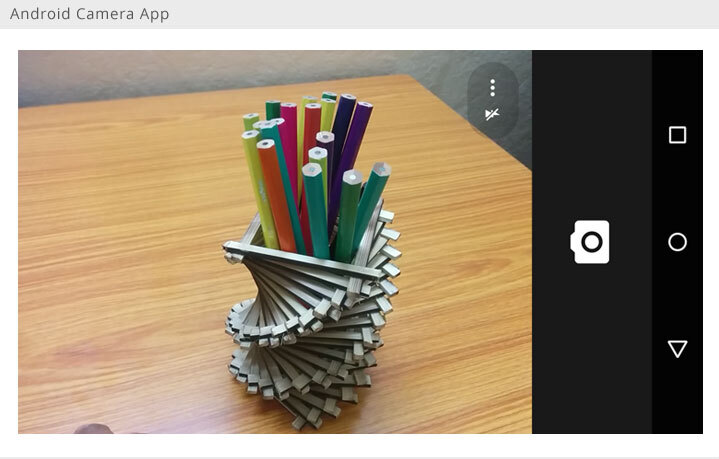
8. Add below camera related code in your MainActivity.java class. This code is directly taken from this tutorial.
In brief what this activity will do is,
> Camera app will be launched on tapping take picture or record video button.
> Once the image / video is captured, it will be stored on to mobile SDCard.
> Finally UploadActivity will be launched by passing the SDCard path of the media that is captured. The process of uploading will be done in UploadActivity.
MainActivity.java
package net.infotheme.camerafileupload;

import java.io.File;
import java.text.SimpleDateFormat;
import java.util.Date;
import java.util.Locale;

import android.app.Activity;
import android.content.Intent;
import android.content.pm.PackageManager;
import android.graphics.Color;
import android.graphics.drawable.ColorDrawable;
import android.net.Uri;
import android.os.Bundle;
import android.os.Environment;
import android.provider.MediaStore;
import android.util.Log;
import android.view.View;
import android.widget.Button;
import android.widget.Toast;

public class MainActivity extends Activity {

    // LogCat tag
    private static final String TAG = MainActivity.class.getSimpleName();


    // Camera activity request codes
    private static final int CAMERA_CAPTURE_IMAGE_REQUEST_CODE = 100;
    private static final int CAMERA_CAPTURE_VIDEO_REQUEST_CODE = 200;

    public static final int MEDIA_TYPE_IMAGE = 1;
    public static final int MEDIA_TYPE_VIDEO = 2;

    private Uri fileUri; // file url to store image/video

    private Button btnCapturePicture, btnRecordVideo;

    @Override
    protected void onCreate(Bundle savedInstanceState) {
        super.onCreate(savedInstanceState);
        setContentView(R.layout.activity_main);

        // Changing action bar background color
        // These two lines are not needed
        getActionBar().setBackgroundDrawable(new ColorDrawable(Color.parseColor(getResources().getString(R.color.action_bar))));

        btnCapturePicture = (Button) findViewById(R.id.btnCapturePicture);
        btnRecordVideo = (Button) findViewById(R.id.btnRecordVideo);

        /**
         * Capture image button click event
         */
        btnCapturePicture.setOnClickListener(new View.OnClickListener() {

            @Override
            public void onClick(View v) {
                // capture picture
                captureImage();
            }
        });

        /**
         * Record video button click event
         */
        btnRecordVideo.setOnClickListener(new View.OnClickListener() {

            @Override
            public void onClick(View v) {
                // record video
                recordVideo();
            }
        });

        // Checking camera availability
        if (!isDeviceSupportCamera()) {
            Toast.makeText(getApplicationContext(),
                    "Sorry! Your device doesn't support camera",
                    Toast.LENGTH_LONG).show();
            // will close the app if the device does't have camera
            finish();
        }
    }

    /**
     * Checking device has camera hardware or not
     * */
    private boolean isDeviceSupportCamera() {
        if (getApplicationContext().getPackageManager().hasSystemFeature(
                PackageManager.FEATURE_CAMERA)) {
            // this device has a camera
            return true;
        } else {
            // no camera on this device
            return false;
        }
    }

    /**
     * Launching camera app to capture image
     */
    private void captureImage() {
        Intent intent = new Intent(MediaStore.ACTION_IMAGE_CAPTURE);

        fileUri = getOutputMediaFileUri(MEDIA_TYPE_IMAGE);

        intent.putExtra(MediaStore.EXTRA_OUTPUT, fileUri);

        // start the image capture Intent
        startActivityForResult(intent, CAMERA_CAPTURE_IMAGE_REQUEST_CODE);
    }

    /**
     * Launching camera app to record video
     */
    private void recordVideo() {
        Intent intent = new Intent(MediaStore.ACTION_VIDEO_CAPTURE);

        fileUri = getOutputMediaFileUri(MEDIA_TYPE_VIDEO);

        // set video quality
        intent.putExtra(MediaStore.EXTRA_VIDEO_QUALITY, 1);

        intent.putExtra(MediaStore.EXTRA_OUTPUT, fileUri); // set the image file
                                                            // name

        // start the video capture Intent
        startActivityForResult(intent, CAMERA_CAPTURE_VIDEO_REQUEST_CODE);
    }

    /**
     * Here we store the file url as it will be null after returning from camera
     * app
     */
    @Override
    protected void onSaveInstanceState(Bundle outState) {
        super.onSaveInstanceState(outState);

        // save file url in bundle as it will be null on screen orientation
        // changes
        outState.putParcelable("file_uri", fileUri);
    }

    @Override
    protected void onRestoreInstanceState(Bundle savedInstanceState) {
        super.onRestoreInstanceState(savedInstanceState);

        // get the file url
        fileUri = savedInstanceState.getParcelable("file_uri");
    }


    /**
     * Receiving activity result method will be called after closing the camera
     * */
    @Override
    protected void onActivityResult(int requestCode, int resultCode, Intent data) {
        // if the result is capturing Image
        if (requestCode == CAMERA_CAPTURE_IMAGE_REQUEST_CODE) {
            if (resultCode == RESULT_OK) {

                // successfully captured the image
                // launching upload activity
                launchUploadActivity(true);


            } else if (resultCode == RESULT_CANCELED) {

                // user cancelled Image capture
                Toast.makeText(getApplicationContext(),
                        "User cancelled image capture", Toast.LENGTH_SHORT)
                        .show();

            } else {
                // failed to capture image
                Toast.makeText(getApplicationContext(),
                        "Sorry! Failed to capture image", Toast.LENGTH_SHORT)
                        .show();
            }

        } else if (requestCode == CAMERA_CAPTURE_VIDEO_REQUEST_CODE) {
            if (resultCode == RESULT_OK) {

                // video successfully recorded
                // launching upload activity
                launchUploadActivity(false);

            } else if (resultCode == RESULT_CANCELED) {

                // user cancelled recording
                Toast.makeText(getApplicationContext(),
                        "User cancelled video recording", Toast.LENGTH_SHORT)
                        .show();

            } else {
                // failed to record video
                Toast.makeText(getApplicationContext(),
                        "Sorry! Failed to record video", Toast.LENGTH_SHORT)
                        .show();
            }
        }
    }

    private void launchUploadActivity(boolean isImage){
        Intent i = new Intent(MainActivity.this, UploadActivity.class);
        i.putExtra("filePath", fileUri.getPath());
        i.putExtra("isImage", isImage);
        startActivity(i);
    }

    /**
     * ------------ Helper Methods ----------------------
     * */

    /**
     * Creating file uri to store image/video
     */
    public Uri getOutputMediaFileUri(int type) {
        return Uri.fromFile(getOutputMediaFile(type));
    }

    /**
     * returning image / video
     */
    private static File getOutputMediaFile(int type) {

        // External sdcard location
        File mediaStorageDir = new File(
                Environment
                        .getExternalStoragePublicDirectory(Environment.DIRECTORY_PICTURES),
                Config.IMAGE_DIRECTORY_NAME);

        // Create the storage directory if it does not exist
        if (!mediaStorageDir.exists()) {
            if (!mediaStorageDir.mkdirs()) {
                Log.d(TAG, "Oops! Failed create "
                        + Config.IMAGE_DIRECTORY_NAME + " directory");
                return null;
            }
        }

        // Create a media file name
        String timeStamp = new SimpleDateFormat("yyyyMMdd_HHmmss",
                Locale.getDefault()).format(new Date());
        File mediaFile;
        if (type == MEDIA_TYPE_IMAGE) {
            mediaFile = new File(mediaStorageDir.getPath() + File.separator
                    + "IMG_" + timeStamp + ".jpg");
        } else if (type == MEDIA_TYPE_VIDEO) {
            mediaFile = new File(mediaStorageDir.getPath() + File.separator
                    + "VID_" + timeStamp + ".mp4");
        } else {
            return null;
        }

        return mediaFile;
    }
}
Now if you run the app, you should see following output.
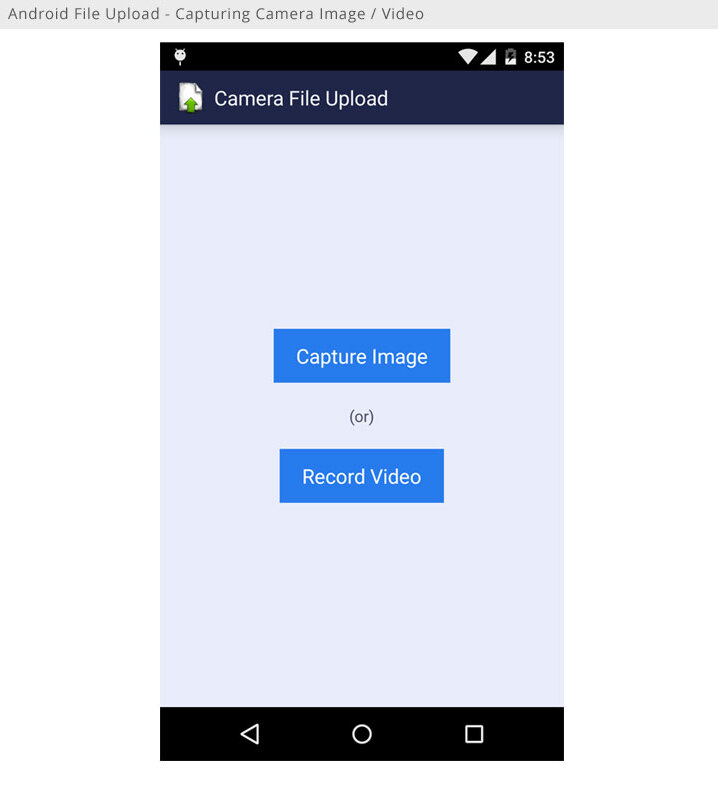
Once you are able to launch camera and capture images, we can move forward and start creating the upload activity.
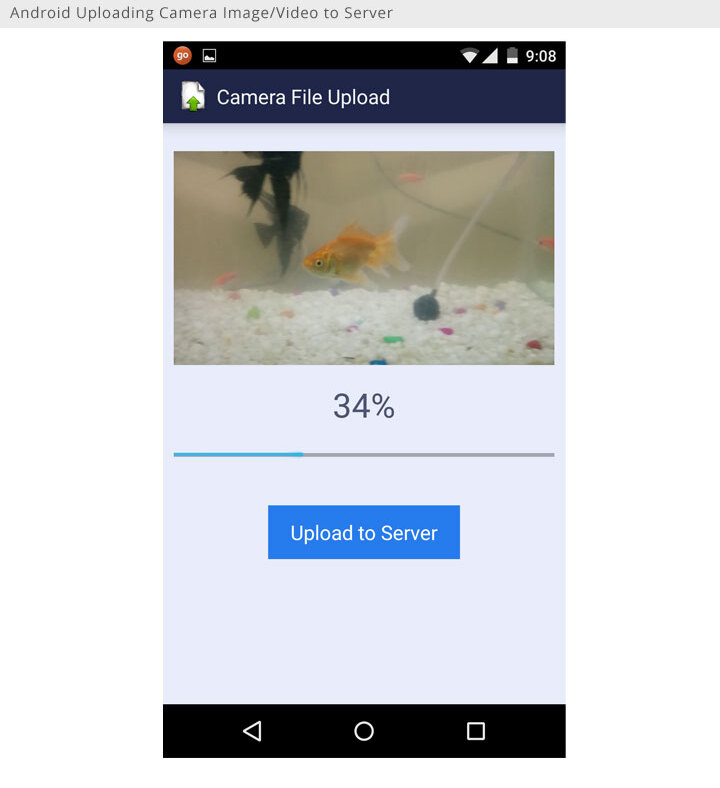
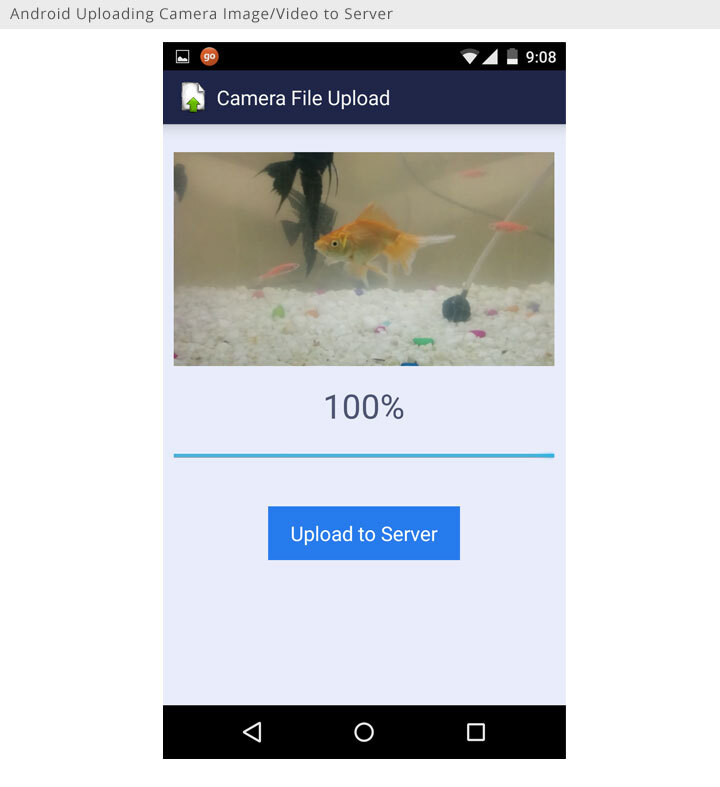
9. Create an xml file under res ⇒ layout folder named activity_upload.xml. This layout contains ImageView, VideoView to preview the captured media and a ProgressBar to show uploading progress.
activity_upload.xml
<?xml version="1.0" encoding="utf-8"?>
<LinearLayout xmlns:android="http://schemas.android.com/apk/res/android"
    android:layout_width="fill_parent"
    android:layout_height="fill_parent"
    android:background="@color/view_background"
    android:orientation="vertical"
    android:padding="10dp" >


    <!-- To display picture taken -->

    <ImageView
        android:id="@+id/imgPreview"
        android:layout_width="fill_parent"
        android:layout_height="200dp"
        android:visibility="gone"
        android:layout_marginTop="15dp"/>

    <!-- Videoview to preview recorded video -->

    <VideoView
        android:id="@+id/videoPreview"
        android:layout_width="fill_parent"
        android:layout_height="400dp"
        android:visibility="gone"
        android:layout_marginTop="15dp"/>

    <TextView
        android:id="@+id/txtPercentage"
        android:layout_width="wrap_content"
        android:layout_height="wrap_content"
        android:layout_gravity="center_horizontal"
        android:layout_marginBottom="15dp"
        android:layout_marginTop="15dp"
        android:textColor="@color/txt_font"
        android:textSize="30dp" />

    <ProgressBar
        android:id="@+id/progressBar"
        style="?android:attr/progressBarStyleHorizontal"
        android:layout_width="fill_parent"
        android:layout_height="20dp"
        android:layout_marginBottom="35dp"
        android:visibility="gone"/>

    <Button
        android:id="@+id/btnUpload"
        android:layout_width="wrap_content"
        android:layout_height="wrap_content"
        android:layout_gravity="center_horizontal"
        android:background="@color/btn_bg"
        android:paddingLeft="20dp"
        android:paddingRight="20dp"
        android:text="@string/btnUploadToServer"
        android:textColor="@color/white"
        android:layout_marginBottom="20dp"/>

</LinearLayout>
10. Create a class named UploadActivity.java and paste below code. In this activity
> The path of captured camera image/video is received from MainActivity and image/video is displayed on the screen for preview purpose.
> UploadFileToServer async method takes care of uploading file to server and updating the Progress Bar.
UploadActivity.java
package net.infotheme.camerafileupload;

import net.infotheme.camerafileupload.AndroidMultiPartEntity.ProgressListener;

import java.io.File;
import java.io.IOException;

import org.apache.http.HttpEntity;
import org.apache.http.HttpResponse;
import org.apache.http.client.ClientProtocolException;
import org.apache.http.client.HttpClient;
import org.apache.http.client.methods.HttpPost;
import org.apache.http.entity.mime.content.FileBody;
import org.apache.http.entity.mime.content.StringBody;
import org.apache.http.impl.client.DefaultHttpClient;
import org.apache.http.util.EntityUtils;

import android.app.Activity;
import android.app.AlertDialog;
import android.content.DialogInterface;
import android.content.Intent;
import android.graphics.Bitmap;
import android.graphics.BitmapFactory;
import android.graphics.Color;
import android.graphics.drawable.ColorDrawable;
import android.os.AsyncTask;
import android.os.Bundle;
import android.util.Log;
import android.view.View;
import android.widget.Button;
import android.widget.ImageView;
import android.widget.ProgressBar;
import android.widget.TextView;
import android.widget.Toast;
import android.widget.VideoView;

public class UploadActivity extends Activity {
    // LogCat tag
    private static final String TAG = MainActivity.class.getSimpleName();

    private ProgressBar progressBar;
    private String filePath = null;
    private TextView txtPercentage;
    private ImageView imgPreview;
    private VideoView vidPreview;
    private Button btnUpload;
    long totalSize = 0;

    @Override
    protected void onCreate(Bundle savedInstanceState) {
        super.onCreate(savedInstanceState);
        setContentView(R.layout.activity_upload);
        txtPercentage = (TextView) findViewById(R.id.txtPercentage);
        btnUpload = (Button) findViewById(R.id.btnUpload);
        progressBar = (ProgressBar) findViewById(R.id.progressBar);
        imgPreview = (ImageView) findViewById(R.id.imgPreview);
        vidPreview = (VideoView) findViewById(R.id.videoPreview);

        // Changing action bar background color
        getActionBar().setBackgroundDrawable(
                new ColorDrawable(Color.parseColor(getResources().getString(
                        R.color.action_bar))));

        // Receiving the data from previous activity
        Intent i = getIntent();

        // image or video path that is captured in previous activity
        filePath = i.getStringExtra("filePath");

        // boolean flag to identify the media type, image or video
        boolean isImage = i.getBooleanExtra("isImage", true);

        if (filePath != null) {
            // Displaying the image or video on the screen
            previewMedia(isImage);
        } else {
            Toast.makeText(getApplicationContext(),
                    "Sorry, file path is missing!", Toast.LENGTH_LONG).show();
        }

        btnUpload.setOnClickListener(new View.OnClickListener() {

            @Override
            public void onClick(View v) {
                // uploading the file to server
                new UploadFileToServer().execute();
            }
        });

    }

    /**
     * Displaying captured image/video on the screen
     * */
    private void previewMedia(boolean isImage) {
        // Checking whether captured media is image or video
        if (isImage) {
            imgPreview.setVisibility(View.VISIBLE);
            vidPreview.setVisibility(View.GONE);
            // bimatp factory
            BitmapFactory.Options options = new BitmapFactory.Options();

            // down sizing image as it throws OutOfMemory Exception for larger
            // images
            options.inSampleSize = 8;

            final Bitmap bitmap = BitmapFactory.decodeFile(filePath, options);

            imgPreview.setImageBitmap(bitmap);
        } else {
            imgPreview.setVisibility(View.GONE);
            vidPreview.setVisibility(View.VISIBLE);
            vidPreview.setVideoPath(filePath);
            // start playing
            vidPreview.start();
        }
    }

    /**
     * Uploading the file to server
     * */
    private class UploadFileToServer extends AsyncTask<Void, Integer, String> {
        @Override
        protected void onPreExecute() {
            // setting progress bar to zero
            progressBar.setProgress(0);
            super.onPreExecute();
        }

        @Override
        protected void onProgressUpdate(Integer... progress) {
            // Making progress bar visible
            progressBar.setVisibility(View.VISIBLE);

            // updating progress bar value
            progressBar.setProgress(progress[0]);

            // updating percentage value
            txtPercentage.setText(String.valueOf(progress[0]) + "%");
        }

        @Override
        protected String doInBackground(Void... params) {
            return uploadFile();
        }

        @SuppressWarnings("deprecation")
        private String uploadFile() {
            String responseString = null;

            HttpClient httpclient = new DefaultHttpClient();
            HttpPost httppost = new HttpPost(Config.FILE_UPLOAD_URL);

            try {
                AndroidMultiPartEntity entity = new AndroidMultiPartEntity(
                        new ProgressListener() {

                            @Override
                            public void transferred(long num) {
                                publishProgress((int) ((num / (float) totalSize) * 100));
                            }
                        });

                File sourceFile = new File(filePath);

                // Adding file data to http body
                entity.addPart("image", new FileBody(sourceFile));

                // Extra parameters if you want to pass to server
                entity.addPart("website",
                        new StringBody("www.infotheme.net"));
                entity.addPart("email", new StringBody("abc@gmail.com"));

                totalSize = entity.getContentLength();
                httppost.setEntity(entity);

                // Making server call
                HttpResponse response = httpclient.execute(httppost);
                HttpEntity r_entity = response.getEntity();

                int statusCode = response.getStatusLine().getStatusCode();
                if (statusCode == 200) {
                    // Server response
                    responseString = EntityUtils.toString(r_entity);
                } else {
                    responseString = "Error occurred! Http Status Code: "
                            + statusCode;
                }

            } catch (ClientProtocolException e) {
                responseString = e.toString();
            } catch (IOException e) {
                responseString = e.toString();
            }

            return responseString;

        }

        @Override
        protected void onPostExecute(String result) {
            Log.e(TAG, "Response from server: " + result);

            // showing the server response in an alert dialog
            showAlert(result);

            super.onPostExecute(result);
        }

    }

    /**
     * Method to show alert dialog
     * */
    private void showAlert(String message) {
        AlertDialog.Builder builder = new AlertDialog.Builder(this);
        builder.setMessage(message).setTitle("Response from Servers")
                .setCancelable(false)
                .setPositiveButton("OK", new DialogInterface.OnClickListener() {
                    public void onClick(DialogInterface dialog, int id) {
                        // do nothing
                    }
                });
        AlertDialog alert = builder.create();
        alert.show();
    }

}
Until now we are done with android project. Now let’s quickly create the PHP project to receive the file that is being sent from android app. But before that, we need to do small configuration changes to WAMP server.
2. Installing & Configuring WAMP Server
1. Download and install WAMP software. On windows machine, WAMP will be installed at C:\wamp location.
2. Open php.ini and modify below values. By default wamp server allows maximum of 2MB file only to upload. After changing the below values, you can upload the files upto 50MB size.
upload_max_filesize = 50M
post_max_size = 50M
max_input_time = 300
max_execution_time = 300
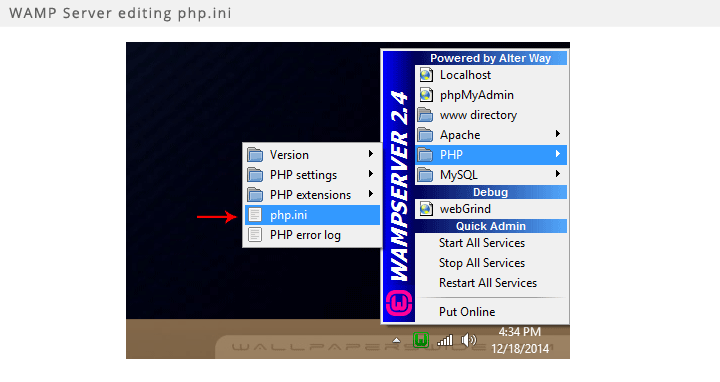
3. Now restart the WAMP server.
3. Creating PHP Project
1. Go inside C:\wamp\www and create a folder named AndroidFileUpload. This will be the root directory of our project.
2. Now go into AndroidFileUpload folder and create a folder named uploads to keep all the uploaded files.
3. Create a file named fileUpload.php and paste below content. Below php code takes care of receiving the files from android app and store them in uploads folder. Upon the processing the file, server responds with a JSON message.
fileUpload.php
<?php

// Path to move uploaded files
$target_path = "uploads/";

// array for final json respone
$response = array();

// getting server ip address
$server_ip = gethostbyname(gethostname());

// final file url that is being uploaded
$file_upload_url = 'http://' . $server_ip . '/' . 'AndroidFileUpload' . '/' . $target_path;


if (isset($_FILES['image']['name'])) {
    $target_path = $target_path . basename($_FILES['image']['name']);

    // reading other post parameters
    $email = isset($_POST['email']) ? $_POST['email'] : '';
    $website = isset($_POST['website']) ? $_POST['website'] : '';

    $response['file_name'] = basename($_FILES['image']['name']);
    $response['email'] = $email;
    $response['website'] = $website;

    try {
        // Throws exception incase file is not being moved
        if (!move_uploaded_file($_FILES['image']['tmp_name'], $target_path)) {
            // make error flag true
            $response['error'] = true;
            $response['message'] = 'Could not move the file!';
        }

        // File successfully uploaded
        $response['message'] = 'File uploaded successfully!';
        $response['error'] = false;
        $response['file_path'] = $file_upload_url . basename($_FILES['image']['name']);
    } catch (Exception $e) {
        // Exception occurred. Make error flag true
        $response['error'] = true;
        $response['message'] = $e->getMessage();
    }
} else {
    // File parameter is missing
    $response['error'] = true;
    $response['message'] = 'Not received any file!F';
}

// Echo final json response to client
echo json_encode($response);
?>
Below is the sample JSON response if the file is uploaded successfully. You can use error value to verify the upload on android side.
{
    "file_name": "DSC_0021.JPG",
    "email": "admin@infotheme.net",
    "website": "www.infotheme.net",
    "message": "File uploaded successfully!",
    "error": false,
    "file_path": "http://192.168.0.104/AndroidFileUpload/uploads/DSC_0021.JPG"
}
4. Testing the File Upload (localhost)
The following steps shows you how to test the both apps together locally.
1. Connect the both the devices (machine running the wamp server & android mobile) to same wifi network.
2. Start the WAMP server.
3. Get the ip address of the machine that is running the PHP project. You can get the ip address by typing ipconfig in command prompt. (On mac os, use ifconfig to get the ip address)
4. Replace the ip address in Config.java (check 4th step in android project) with your ip address.
5. Deploy & run the android app on the mobile.
References
1. Stackoverflow Question about file upload with progress bar.
2. Icon that I used as app icon.