
Learn how to resolve “Missing A Temporary Directory” WordPress
Missing a Temporary Directory error is one of the most common and frustrating error which are faced by many WP users. Normally, this issue occurs when you try to upload any image on media section or try to upload any plugin or theme file. Due to this error you will not able to upload anything and creates a very frustrating situation for you.
What is this “Missing a Temporary Folder” error?

Explaining this issue could be a little bit complicated but let me try to explain this to you in a very simple way. To explain this, let me share with you once you upload any media file, plugin or theme file on your WP website, WordPress CMS works on two steps:
- First WordPress move your uploaded file into a Temporary folder to save them
- After that it WordPress Create or Move your uploaded file into an appropriate directory
Let us understand this with an example: When you upload a new theme on your WordPress website, Wordpress first store it into a “Temp” (Temporary) folder and after that creates a new folder for your uploaded theme and finally move your theme files into this folder.
Why this “Missing a Temporary Folder” occurs?
As we already understand how WP system works when we upload any file on your WordPress website. Now, it will become easy for me to explain you why this error occurs J
This error occurs when this “temp” folder gets deleted from your server accidently either by you or by any server side malfunction or due to any other script.
This issue can also be occurs due to some permission issue set by your website hosting server.
Learn how to fix “Missing a Temporary Folder” error
There are many solutions available to resolve this error introduced by any WP experts but I will try to explain the most simple and easy method to do it.
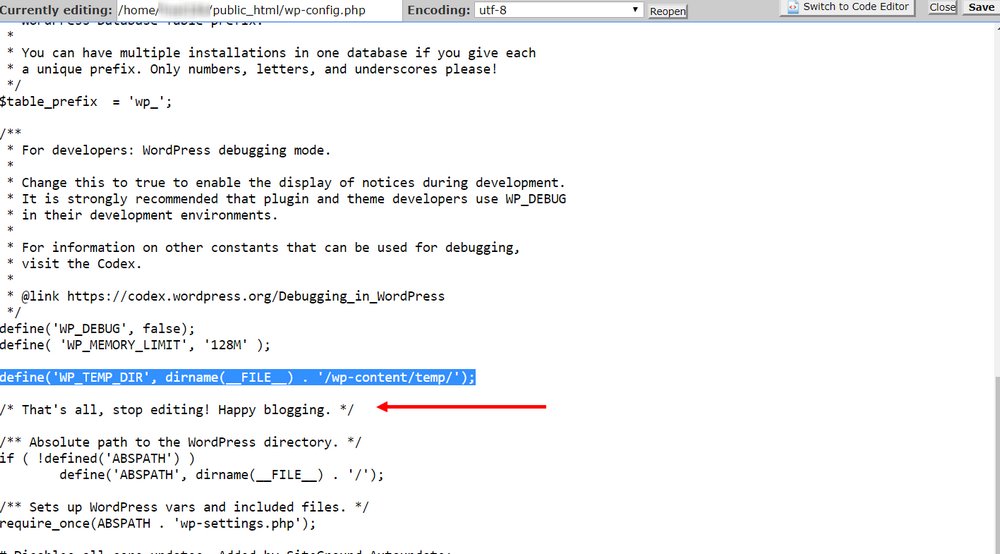
We will add a line of code shared below on “wp-config.php” file.
define(‘WP_TEMP_DIR’,dirname(_FILE_). ‘/wp-content/temp/’);
We can access and edit this file using your “File Manage Logins” or your “CPanel logins”.
Add error resolve code on “wp-config.php” file using File Manager
Let us understand how we can resolve this issue using File Manager login step by step:
- Use any FTP client app like Filezilla
- Use your FTP logins like: hostname, username, password, port
- Connect Filezilla ( or any other FTP app client) to your server, now you will be able to see your website files
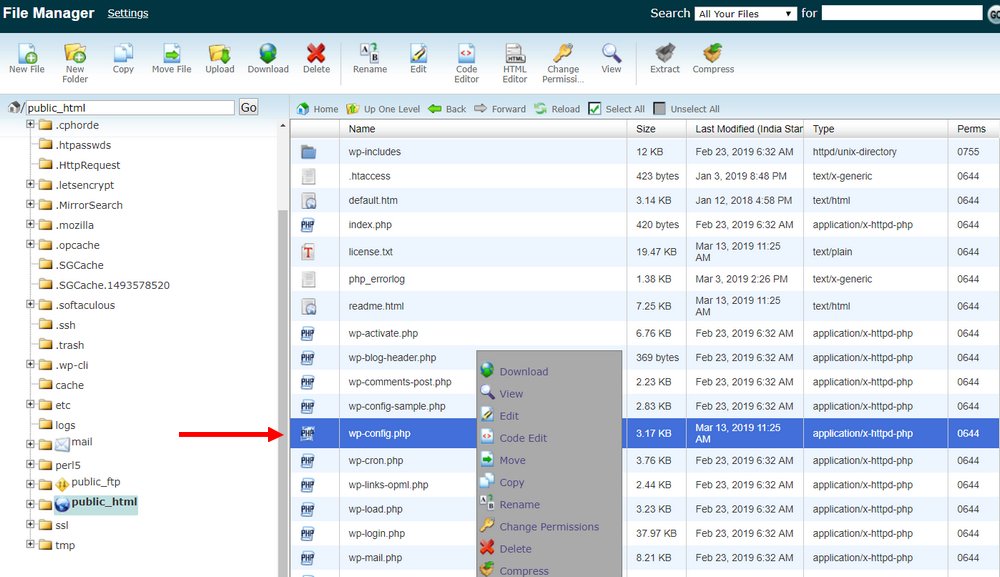
- Open “public_html” folder
- Now, you will see “wp-config.php” file, right click on it and download this file.
- Open this file on any text editor like “notepad++” or “visual studio”, or “notepad” or anything you like.
- Copy
below line of code:
- define(‘WP_TEMP_DIR’,dirname(_FILE_). ‘/wp-content/temp/
- Paste it on file just
at any location below:
- Right before the line that says “That’s all, stop editing! Happy blogging” Or,
- After define debug line or define memory limit line
- Save the changes and upload the updated file on server.
Above steps will define the location of temp (Temporary) folder so that WordPress can look for this location to find “temp” folder.
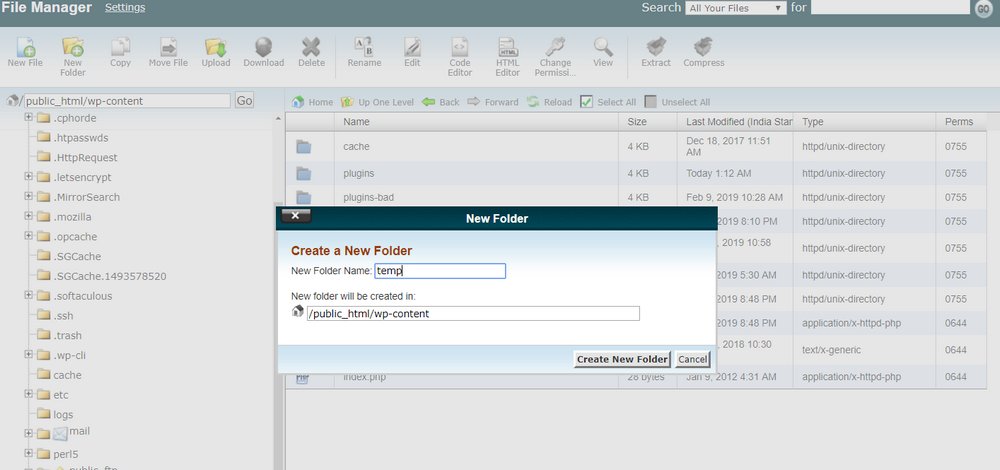
Now, we have to make a final change. We will have to create a “temp” folder inside “wp-content” directory on your server. To do this follow the below steps:
- Locate and open “wp-content” folder
- Create a folder named “temp” on this location or Create an empty folder with name of “temp” on your local system and upload that here.
Now you are all done!
We have resolved this issue. Now you will be able to upload any media file, plugin file or theme file on your WP website.
Add error resolve code on “wp-config.php” file using CPanel
We can access and modify the “wp-config.php” file using your CPanel logins as well and can resolve this issue. Let us understand this step by step:


- Login to your website hosting server using your CPanel logins. Normally, you can access your cpanel by adding /cpanel at the end of your website URL. For example: yourwebsite.com/cpanel or any other link provided to you by your hosting company.
- Use your CPanel logins to access your CPanel admin dashboard.
- Locate “File Manger” folder on your Cpanel and click on it to open.
- Now, you will be able to see your WordPress website files.
- Locate and open “public_html” folder
- Now, you will be able to view “wp-config.php” file
- Right click on this file and open it on text or code editor
- Copy
below line of code:
- define(‘WP_TEMP_DIR’,dirname(_FILE_). ‘/wp-content/temp/
- Paste it on file just
at any location below:
- Right before the line that says “That’s all, stop editing! Happy blogging” Or,
- After define debug line or define memory limit line
- Save the changes and close the file editor.
As we have added the code on file, it will tells the WordPress system to look for the “temp” folder inside the “wp-content” folder.
But we don’t have any folder there. Now, we have to make a final change.
- Open the “wp-content” folder
- Right click and click on “Create a new folder” option and name it as “temp”
Now, we have made the necessary changes to resolve this “Upload a Temporary Folder” issue.
Final Thoughts
Try to follow this tutorial to resolve this issue but if the issue still persist, it could be a reason of your hosting server settings or permission issue set by them.
The best way to resolve the server related issue to contact your hosting server support team either via Phone Support, chat support, email support and they will resolve this issue for you. I hope this tutorial will be helpful to you.